Showing posts with label Holographic. Show all posts

Tuesday, July 23, 2013

Copycat

So a couple of weeks back I was sporting a loud mismatched manicure I would classify as 'Jersey-style' and my teenaged Client came back and said 'I want what you were wearing last time I was here'


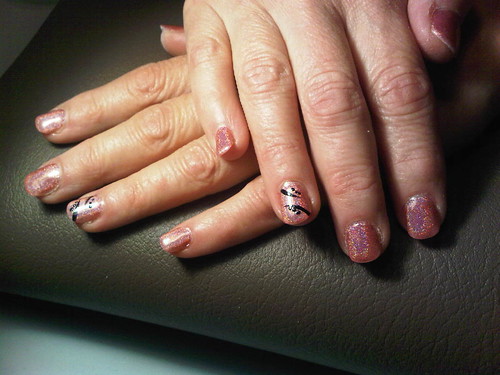
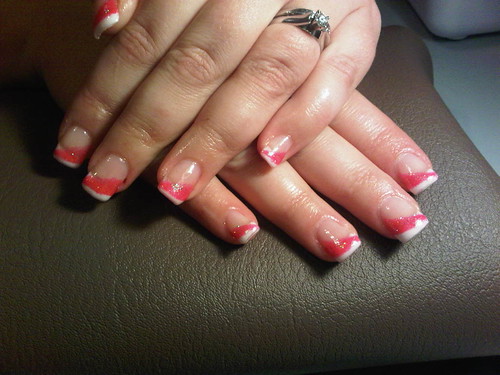
And so I did it but added a little upgrade to it.  She has done such a good job taking care of her nails and it's showing.  This is 2 coats of Gelish Sweet Morning Dew with iridescent glitter scrubbed into the ring nail, holographic gold glitter scrubbed on the thumbs over gold Gelish Danny's Little Helper and then a simple zebra stripe black Konad on her middle fingers.


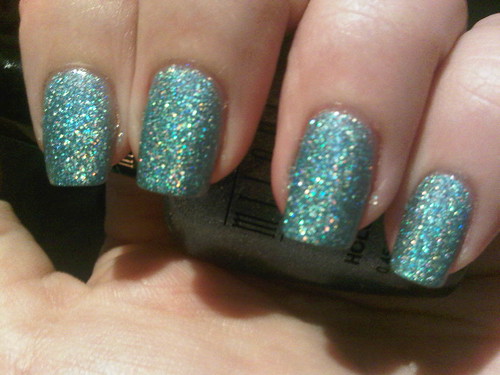
When I did this manicure on myself, I had broken my thumb nail and removed the Gelish so I used just regular polish in China Glaze's Blonde Bombshell.  The holographic gold glitter I used here on her nails is insanely sparkly.  When she left I could see her just staring at nails while walking down the street :)


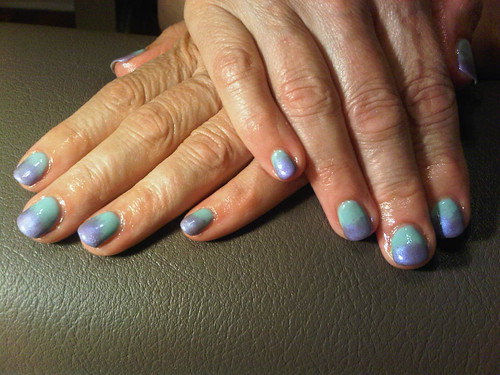
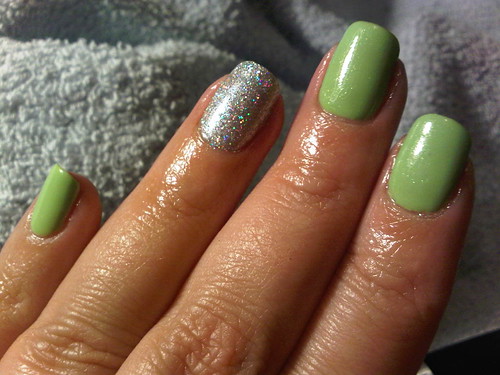
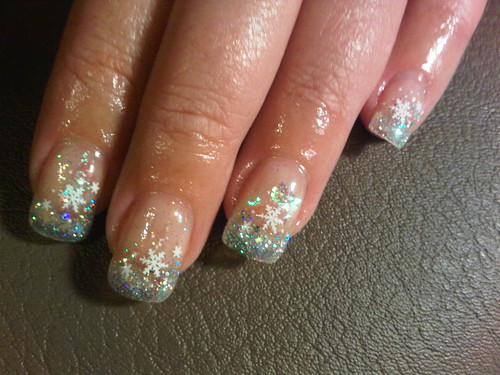
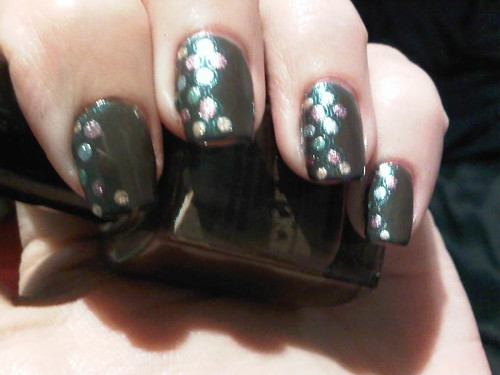
Here's a little something I did on my favorite Client.  I removed most of her gel extensions but she does have an overlay on some nails.  I gave her 2 coats of Gelish Seafoam and faded in some purple pearl powder.  Rexall was clearing out all their pearl and glitter powder eyeshadows for $1.50 and I picked up about 20 of them.  They're perfect for nails.

I'm excited for my Client tonight who's getting married on the weekend.  This will be my first official set of wedding nails and I'm pumped to see what she has in mind for her black and white wedding dress!

Later
P

Saturday, July 20, 2013

Just for me


So ever since I've been doing nails professionally you may have noticed that my own nails have sported some loud, flashy and 'totally not me' colours and designs.  People notice when you have crazy shit on your nails and it's a form of advertising for me.  But I haven't really enjoyed my own nails lately and so I decided to do a manicure just for me.  And all I can say about this is 'aaaahhhhh much better'


This is 2 coats of Gelish You're Such A Sweet-Tart with an accent of some random silver gel with holographic glitter scrubbed in (aka Rockstar).  This polish has a subtle shimmer and the colour in real life is more lime like the top photo than pea green.  This was another very streaky Gelish and I'm little annoyed that their creamier polishes all seem to be like this.

I also decided to round off my square nails but honestly I'm not loving the shape.  I also had to shorten them quite a bit.  It's difficult to do Clients when my nails are so long.

Later
P

Wednesday, May 8, 2013

Extended break

I missed blogging.  Not sure if I can keep up to my previous pace but I'm going to put some effort into this again.  And my direction is also going to change here somewhat as well since I'm now a licensed Nail Tech.

I have access now to so many cool things in the nail world and I'm still obsessed with Gel polish.  I pretty much lost my passion for the nail blog world last fall.  I was tired of seeing all this indie crap being posted and just really didn't see what the fuss is about.  I still don't, but in any case you won't see much regular nail polish on this blog anymore.

So having said that, let's see some RNP (regular nail polish) photos:


I picked up all 3 of the China Glaze Ombre kits when they came out.  $11 for 4 CG polishes was a friggen steal so I bought them all!  FYI my new blackberry camera sucks ass so the quality of my photos has declined quite a bit.

For my birthday this year I treated myself to the entire Hologlam display:


Yeah it's sideways, I don't give a shit lol and you guys have all seen it a million times now anyways.  This looks pretty awesome in my nail studio.

That's pretty much all the RNP I've purchased over the last 6 months.  I've spent a lot on gel supplies though.  In fact my haul from last weekend was pretty awesome:


The Axxium and 6 of the OPI Gelcolors were a steal at less than $50.  I did splurge on the OPI Gelcolor from the Oz Collection - When Monkeys Fly (which doesn't curl like the RNP version does).  I also picked up 3 colours from the brand new CND Vinylux line (not pictured) and I'm excited to try those out but have no one to test them on.  I suppose I could wear it over my gel polish.  I'm overwhelmed right now with new stuff to try.

Hopefully I can keep this up again.

Later
P

Monday, November 5, 2012

Busy with gels


My Mom managed to keep her gels for one full week so far.  She wasn't fond of the square shape so I rounded them for her, added 2 coats of OPI DS Passion and a little bit of simple nail art.


The Princess of poo was due for a fill so I redid her french, shortened them a bit and added some pink glitter.  I don't like it but she does so I suppose that's all that matters.


I also did a fill on myself even though I didn't really need it and removed the dark french.  I used a bit of holographic and iridescent glitter and decided it looked so wintery that I needed to stamp snowflakes on it.  It's still pretty blingy.

I'm officially launching my business this week.  I'm curious to see how this goes...

Later
P

Monday, August 27, 2012

Another packed post

So I'll start this one off with another regular nail polish.


This is 2 coats of OPI A-Taupe The Space Needle.  I added OPI DS Desire accents.  It's funny after wearing soak offs for so long I forgot how quickly nail polish chips.


I got some more pearl powder samples from my boyfriend's dad's autobody shop.  I just scrubbed them over black polish. From L-R is Fine Blue, Violet, Red, Sunset Red, Copper, Green and Green-blue.  With all the buzz over the Shellac Additives lately, I knew I had to try these out...


This is 2 coats of Shellac Silver Chrome with Copper pearl powder scrubbed in.  I had a small haul of nail supplies from China and decided to try out a fimo slice.  I cut it as thin as I possibly could, but the raised edge is really friggen annoying.  I bought them to use on other people anyways, so no big deal.

Totally off topic but we went to FanExpo in Toronto last week.  I was really excited to see one of my favorite actors there:


It's Norman Reedus who most people will recognize as Darrell from The Walking Dead.  But to me he's one half of the Murphy brothers from The Boondock Saints :D.

And finally, my nail-biting mother ripped all her acrylic nails off and this time she wanted them shorter, more rounded and more natural looking.


I managed to correct a few things this time around so they came out thinner than last time but I need some work on my shaping skills.  It will be interesting to see what other tips and tricks I can get from the course next month.  I think once I'm certified that I will start out offering Shellac only at first since I'm already a pro at that.  Nail extensions are pretty damn hard, it's definitely an art form.

Later
P

Thursday, July 26, 2012

Hauly Crap!

Well this post ranks right up there in my top 5 hauls for sure.  I was browsing Kijiji again and found some OPI Gelcolors.


L-R: Alpine Snow, Pompeii Purple, Princesses Rule, Strawberry Margarita and Pink Flamenco.


Bubble Bath, Kyoto Pearl, Bastille My Heart and Louvre Me Louvre Me Not.


Big Apple Red, Bogota Blackberry, OPI Ink, Malaga Wine (missing-top coat).

So 14 OPI Gelcolors for the bargain price of $95!!!  Many of them were unused and the ones that weren't were basically full anyways.  I paid $20 plus tax each for these at the salon supply.  Pretty awesome deal even if there are too many pinks lol.


So the first colour I tried was Louvre Me Louvre Me Not - 3 coats.  I also tried out the OPI Top Coat for the first time but I'm still using the Shellac Base since I've had such good luck with it.


And a flash photo to show the shimmer.

So here's my thoughts on OPI Gelcolor:
The formula is insanely fussy.  I don't recommend this brand for newbies to soak off gels.  It's the thinnest of all the gels I've tried which sucks.  It takes a lot of coats for opacity.  It requires a lot of shaking to mix it properly.  The biggest offender is the shrinkback and pooling.  It's nearly impossible to cap your edges due to the shrinkback.  The pooling made it hard to get a nice clean manicure.  These colours take a lot of care and patience.  The Top Coat was also super thin which surprised me and was full of bubbles but it wasn't that hard to get rid of them.

The good is of course the colour selection.  I love that these are colours from the regular nail polish line.  I suppose if I actually got a chip in it I could quickly cover it with the matching regular nail polish.  I can't comment on the wear time quite yet as I haven't had it on for even a whole week yet but so far so good at 4 days in.  It does feel more flexible and less thick than other gels.

And so just for fun because I've been slacking lately, I decided to holo it up with a coat of OPI DS Sapphire:


Later
P

Monday, April 2, 2012

Couple O' Swatches

I have soooo many polishes I haven't worn.  My collection is well above 500 now and that's not including the SOG polishes.  So time to stop spending and start swatching.


So first up is Golden Rose Holographic 104.  I purchased a bunch of these a year ago and never got around to wearing them all.  This is 3 coats. Nice light green but the holo really only shows under fluorescent light.


It's a smaller bottle at 6ml but definitely on the cheap side for a holographic polish.  I think I paid less than $3 for it.


Next up is one I'm sure you've all seen but it's only recently been made available in Canada.  Essence Where Is The Party? 2 coats.  Massive disappointment for me really.  Why? Well most of the time it just looks purple.  It's really hard to notice the duochrome coming through.  Especially disappointing when the bottle looks like this:


Bummer.

Later
P

Monday, March 5, 2012

New Konad Review

Something you won't see very often here are sponsored product reviews.  A company really has to interest me in order to get a reply to their email.  Michelle from http://www.nailpolishcanada.com/ contacted me and asked me to review one of the new Konad plates.  I had actually been on their website before which I found through another blog and had planned on placing an order through them eventually because they carry Nubar and Butter London which are hard to find in Canada.

So she sent me Konad plate m84:


Not my usual style but I was more interested in the bow design since I don't have one in any of my 75+ image plates.  Having bought nothing but knock off plates lately I had forgotten about the amazing quality of the original Konad plates.  Great clean and precision-cut images.


I stamped the images using Wet and Wild Black Creme except the pinky finger.  These Konad plates typically have finer lines and so nothing beats the Konad polish for picking up all the details.  Konad Dark Purple was used on the pinky and you can really tell the difference.


Before I stamped the second hand I decided to do a quick and dirty swatch of my newest acquisition - Cosmetic Arts unnamed polish (why don't these bottles have names on them??!!).  A quick Google search tells me this is called Silver Belles.  But you can see that this bottle obviously contains Color Club's coveted Worth the Risque.  For anyone who doesn't already know - Color Club/Studio M/Cosmetic Arts = Forsythe, and they often share colours between them. In any case, a good score at Winners for $3.


And back to the Konad plate using Konad Polish in Dark Purple.  Nice crisp, clean stamping.  I think I'll get some use out of a few of the images.

As I said before, this plate was sent to me for review by Nail Polish Canada and it was shipped to me in a standard #10 envelope and took 8 days to arrive.  I have not yet placed an actual paid order with them but I hope to do so in the future.  Their Konad plates are reasonably priced and so are most of their polishes. 

If they carried soak off gels I probably would have ordered from them already. Now if I could get more of you Canadian girls into doing your own soak offs then maybe retailers would make them more available to us!

Later
P

Wednesday, February 15, 2012

Another Nfu Oh layered gel mani

Ever since I tried water layering with Nfu Oh 61 I have been dying to try it over a really dark colour.  When I did my gel mani in Midnight Affair I knew it was the perfect underwear for it!


Just a reminder on how I did the water layering: Just one drop of Nfu Oh 61 spread out evenly int he water and dip.  This is pretty friggen awesome!


The funny thing I've found about doing the water layering is that a top coat actually enhances the holo instead of diminishes it.  I can't stop staring at the rainbows on my nails!

I've been steadily working on a soak off gel tutorial.  I've had a couple of requests for it and I notice that about 80% of my hits come from searches for Gelish or Shellac. I've almost got the tutorial completed so I should have it up by the end of the week.

Later
P

Thursday, December 8, 2011

OMFG!

This post just couldn't wait til Friday.

I've pretty much proven here how much I suck at water marbling but whenever I do one I always think that using water would be a good method to apply those troublesome layering polishes.  You know...the ones you think would look really awesome if only you could get it thin enough and even enough?

So last night after several failed water marbling attempts I decided to finally give water layering a try.  And what better polish to use than the most troublesome polish of all?  Nfu Oh 61!


So I started with my Gelish Ooba Ooba Blue mani as the base, put one drop of Nfu Oh 61 in the water, let it spread out evenly and dipped.  It did exactly what I was going for...turned my blue manicure into an awesome holographic one!  There's no way I could achieve this by simply painting a coat of Nfu Oh 61 over my polish like normal.


I didn't even bother to tape my nails in advance.  The layer was so thin and light I just swiped the excess off with a q-tip dipped in remover.


I messed up slightly on one finger on my right hand - the middle one - because I didn't let the polish spread properly in the water so you can see that it's thicker on that one finger.  Obviously you can see that a second dip would have made this even more holo, but I was pretty happy with the results anyways.


I took tons of photos because I was thrilled with how well this turned out.  It was actually pretty easy to dip more than one nail at a time too so I had less wasted polish.  All the photos above also have a top coat on them which I don't think diminished the holo at all.

So I think this is an amazing way to create holographic manicures in any shade I want and also extend the life of my precious expensive bottle of Nfu Oh 61.  I cannot wait to try this with other colours and also try out different layering polishes!

Later
P

Monday, November 28, 2011

Friggen Sweet!

So Sally's sells some pretty awesome but expensive glitters in their acrylics section.  And someone on a nail board mentioned that there was a nice sparkly holographic one so of course I had to go check it out.


Doesn't look very holo at first glance and I think this ran me around $5.  Now something I may not have mentioned about soak off gels is that they have a sticky layer on them after curing which is fantastic for adding glitter.


So all I did here was Shellac Base Coat, 1 coat of a random colour ( I used Shellac Negligee) and then smooshed the glitter on with a dry brush, added Gelish Top It Off and cured.  I added a second top coat just to be safe.  I love when I finally do an awesome mani after so many fails :)  The sparkle is insane on this!

Later
P

Monday, November 7, 2011

Knowing when to stop

I think I've finally hit my breaking point with polish hoarding.  I took my usual first-of-the-month trip to Sally and got some pretty sweet deals:


All of this for $21!  Yes that's $3 per polish!  The Orly set was $8.99 and came with a free purse plus I love all 3 colours.  Um yeah I paid $8.99 several weeks ago for just ONE of the Orly mineral effects polishes!  The China Glaze set was $6.99.  I really wanted Twinkle Lights and there were none left on the shelf display.  In fact the shelf display was pretty much bare at noon on the first of the month - wtf?  Anyways China Glaze polishes are $6 at Sally's so why would I buy just one if you can get two more for an extra $1?  And that last little lonely polish?  Color Club!  That was a welcome surprise at Sally's.  It was $6.29 but I had a coupon and I don't own any Color Clubs with the cute little flower on the lid.  Plus it's scented like mint :)

So why, according to my post title, do I have a problem with such an amazing haul?


Green polishes are my weakness.  I love green and they really don't make enough varieties of green.  I would have picked both of those greens in those sets I bought anyways, but when I swatched them I kinda said 'oh shit, I really need to stop buying polish'.

1. China Glaze Holly-day
2. Joe Mallard
3. OPI Don't Mess With OPI
4. Orly Lucky Duck
5. OPI Jade Is The New Black

None of them are exact dupes however the China Glaze and Joe are pretty damn close and so are Lucky Duck and JITNB.  But to the average person they probably all look the same.  I really don't need all 5 of these.

But enough of that, I made some frankens!


I took my ugly coral coloured prism and tinted them fuchsia and dark dusty rose.  They did not translate well when swatched but look perfect in the bottle...sigh.  The one on the far right I'm most excited about.  I really wanted a dark brown creme with blue shimmer and I got it almost spot-on.  I used Revlon Chocolate Truffle and Sally Hansen Marine Scene with a bit of Revlon Beach.  The shimmer turned more teal than blue but that's okay because I love it.


See how the holo's didn't turn out the same?  Weird.  I think they're reversed there as well.  The brown is the first franken I've made that I've actually considered giving a name.  I don't know why I don't name my frankens but this is the first one that I'm totally in love with.


This was 2 coats over my current gel mani which has now reached Day 9.


Then I stamped with Kleancolor Metallic Jungle and plate BM209.  It didn't show up enough so I grabbed the Color Club Foiled Collection and my dotting tool and went to town on it.  It would have turned out better if my stamping was straight but I was too lazy to fix it this time.

Later
P

Monday, October 31, 2011

Can I just say...

That my boyfriend fucking rocks!

We were recently discussing Christmas and I told him 'you can't go wrong with nail polish' lol.  So he told me to make a list, which I did and of course included all the obligatory hard to find and retired polishes, with a little addition at the end of the list - Spectraflair.

So last night he comes home and sets a little bottle down on the table.  It looks like a pretty silvery holo powder.  But he tells me it's not Spectraflair and that he can't get it here, but this stuff is pretty close.  So I immediately ran upstairs to grab my franken supplies.


I mixed it with a random topcoat.  Definitely not Spectraflair but still really cool.  It immediately reminded me of China Glaze's Fairy Dust but I made it more dense.

1.  1 coat Sally Hansen Celeb City, 3 coats Holo Auto Paint
2.  4 coats Holo Auto Paint
3. 1 coat Black Creme, 1 coat Holo Auto Paint
4. 1 coat Black Creme, 2 coats China Glaze Fairy Dust
5. 1 coat Black Creme, 2 coats Holo Auto Paint

The particles are bigger than Fairy Dust and the holo is almost linear at some angles.  I tried mixing it with a grey creme polish but it didn't work.  I thought I would like it best over silver but I prefer the one on it's own.  Sadly I don't think that will translate on the nail.

My boyfriend says they do have a finer grade as well he will try to get for me and I've asked him to find out the name of it.  He did get me a nice size free sample of this.  Damn, if he brings me home shit like this just randomly then I can only imagine what I'll find for Christmas!

Oh and just as an aside, he was laughing his ass off at me while I was taking photos of my nail wheel.  But that's okay because his Star Wars obsession is way beyond my nail polish obsession lol.

Later
P

Thursday, August 11, 2011

I'm a whore for holo


Above is Milani Cyberspace - 3 coats.  This is the only Milani I own and it probably has the worst brush of any polish I've tried.  It's extremely thin and makes it impossible to get even coverage in less than 3 coats.

Random crap: Girly shit sucks.  My younger sister loved kittens and unicorns and rainbows and pink shit.  I fuckin hated it and I made fun of her for it when we were kids.  She also loved NKOTB but we won't go there right now.  I would like to take this opportunity to apologize to the Duchess of Doo because I fucking love rainbows!  I could wear holo nail polish every day for the rest of my life!  Kittens, unicorns and pink still suck ass though.


So I ruined the awesome rainbow with Kleancolor Metallic Aqua and plate BM212.  I also had some stamping issues here, but not from the polish.

I'm in a weird mood today.  Having a bad day but posting about nail polish makes me happy.  I may even go home and slap some more holo polish on ;)

Later
P

Tuesday, July 26, 2011

Epic Win, Epic Win, Epic Win


Epic Win #1 - Awesome metal concert on the weekend with my fave band ever headlining :)  Black nails were mandatory.  I started this one off with one coat of Wet and Wild's Black Creme.


Epic Win #2 - Once coat of Icing's Epic Winning.  The photo sucks but this polish is friggen magical!  The rainbow of colours you get under the light is unbelievable.  I didn't bother to stamp it.  I got tons of compliments on this and could not stop staring at my nails.


Epic Win #3 - An awesome fellow blogger shared with me the location of an amazing warehouse where I procured these little bottles of happiness.

From L-R: White Turquoise, Coral Amber, Emerald Amethyst and Golden Cinnabar.  The best part?  There were fifty cents each!


L-R: Valentino, Night Hydrangea, Showtime (HOLO!), Night Blooms and Ruby Rays.  Also all .50 each.


L-R: Moonstone, Rhodolite Chrome, Kleancolors in Golden Nirvana and Chunky Silver.  On the far right is a shadow pigment that looks like Orly's Galaxy Girl:


Dry on the left and over primer on the right.  I'm going to use this for frankening.


I did swatch them all but because my pics suck so I'm only posting this one to show you the awesomeness of Showtime.  Just to the right of Showtime is Coral Amber which is not my kind of colour at all but it's holo and will make a great franken. 

I only had about 15 minutes in this store but I could have easily spent hours there.  I walked out with 12 polishes for less than $7!  You can bet your ass I'll be back there eventually.  Damn good week :)

Later
P