Thursday, August 29, 2013

Opposite ends of the spectrum

It's very rare now that I do nails for my sister anymore.  For starters she picks them off in less than a week.  Secondly she never pays for them nor offers anything in return.  Like at all...ever.


But every once in awhile I offer to do them for her because I want to try something new...in this case it was my new fluorescent Gelish colours.  I started with a coat of white - Gelish Sheek White and then 2 coats of Gelish Shake it til you Samba with Gelish Amazon Flirt on the ring fingers.  I dotted with a fluorescent green Billie polish but it came out too dark when it dried.


And while she was there I got her to snap a two-hand photo of my own week-old Gelish french.  My nails have never been in such nice shape for such a long time.  I still get the odd chip (you can see it in my slightly rounded middle finger) but I can't even recall the last time I actually broke a nail.

Later
P


Tuesday, August 27, 2013

Back to basics

I had a creative block this week.  Well maybe not entirely true because I do have quite a few ideas but since they all involve dark colours I set them aside until Fall.


I decided to go for the simple french manicure.  It's funny because I never take photos of the french's I do on Clients...they're boring.


I thought I'd mix it up a bit from my usual french.  In nail school we were taught do pink then white but I've noticed some people use pink over the white to soften it up a bit.  I kinda prefer the stark white myself but thought I'd try this out anyways.  I'm trying to remember what I used here but I think it was Gelish Sheek White for the tips and OPI Gelcolor Bubble Bath over top.  The cute little pink bows fell off the next day!  I only applied them with regular top coat and I didn't go over top because I thought it would ruin them.  I didn't even see them fall off so I'm pretty sure they are probably in my dogs belly right now...

Later
P

Thursday, August 22, 2013

Just couldn't do it...

People ask me all the time if my nails are fake.  So why not try to intentionally make them look fake?


These are my natural, clean and freshly manicured nails.  The length is pretty much as long as I can stand to work with.


In lieu of base coat I decided to go with a coat of Gelish Vitagel Strength.


I used Gelish Sweet Morning Dew as a base colour, making extra deep curved smile lines for that 'fake nail' look.  Before I painted the french, I removed the inhibition layer from the Vitagel with a wipe of 99% Isopropyl Alcohol.  This step is to ensure that there is no layer for the glitter to stick to in the next step.


I scrubbed some orange iridescent glitter into the inhibition layer.  Since the Vitagel had already been wiped there was no glitter stuck into the clear layer.


The next step I added some larger glitter pieces, mylar hearts etc and covered them with a layer of Gelish Structure.


And then another layer of Gelish Structure to smooth out any bumps and then removed the inhibition layer for the next step.


I filed with a fine 240-grit file just to make it all perfectly smooth.  Just a very light touch and a high grit file.


Lastly of course is the top coat.  I almost always use Gelish Top It Off.  It's definitely my favourite of the gel top coats.  So did I achieve the fake/acrylic nail 'look'?  Doesn't matter either way because I just couldn't wear this.  I didn't even bother to do my other hand.  I have my limits and this definitely hit it.  I took it off the next morning.  I'm sure someone out there would probably like this kind of thing though.

Later
P

Tuesday, August 20, 2013

Gramma Nails

Ok ok so this is my Mom's nails but she is a Grandmother and the little Countess of Caca loves to see what Gramma's got on her nails every week.


So let's rewind here to October 2012.  I was just finishing up my Nail Tech course and had done a couple sets of acrylics and a Shellac or two on my Mom - the chronic nail biter.  After I removed her acrylics she actually had a bit of free edge which she had never had before in her life.  Unfortunately I never did take a pic of her severely bitten nails.


And here we are in July of 2013.  You can clearly see from this photo that she picks her gel polish off!  However I can't really complain since she's actually managed to keep some good length.  She's also been militant in applying her cuticle oil so I'm happy that she's been able to keep them like this.  Although she does routinely complain that they're too long.  So this was before I shortened, shaped and re-polished them.


So how's that for Gramma nails?  When my Mom comes to get her nails done I ask what she wants and her response is always 'whatever, as long as it's not black'.  And I keep asking her to look online for designs she likes to bring to me because it's a lot of pressure to come up with something...actually no, it's a lot of pressure to come up with something fun for me but suitable for a Gramma lol.  So I said fuckit, I'm gonna do what I want then, and that's what Gramma got! 


So I painted 3 nails in OPI Gelcolor Strawberry Margarita and now that I'm typing this I'm thinking 'oh shit I forgot that polish stains'.  Then I took some tinfoil and added a drop of Shellac Asphalt and a drop of Shellac Cream Puff and mixed them and painted that on her pointer.  Then I painted a coat of Gelish Vegas Nights on her ring finger and smirked at her and said 'nervous?'  She said 'yeah a little bit'.  Then I did another coat of each, whipped out the silver glitter scrubbed it in the ring finger and topped it off with a konad stamp in Pure Ice Silver Mercedes on the pink nails.  I really like it and can't wait to hear what the Countess thinks of Gramma's nails this week.

Later
P

Thursday, August 15, 2013

Minx

So last time I was shopping in Michigan I popped into Ulta and was surprised to see Minx in the clearance aisle for $3!  That's a bargain I just couldn't pass up.


The design I chose was Gold Moons.  I would have purchased all of them but I wasn't sure I'd actually like these so I just bought one.  I applied them over gel polish which was a good thing because they show every tiny little imperfection.  I had a bitch of a time applying these actually.  This was my first time using strips of any kind.


And on my toes the application again was shite but I enjoyed them much more on my feet.  I ended up taking my fingers off after around 24 hours.  Honestly there was no way those edges would smooth out perfectly and they drove me friggen insane catching on shit.  The toes are a week and going strong.  Would I do Minx again?  Nope.


So to cheer myself up I went a little crazy at the Cosmoprof Anniversary sale and picked up a crapload of Gelish and Shellac.  The corals and fluorescent pinks seem to be the hot colours with Clients right now. My official count on the soak off gel collection is now exactly 100! Yeah that's 100 different colours of soak off gel.  Honestly I'm still missing two very important colours in my collection though - a chocolate brown creme and a medium green creme.  Somebody make these colours please and make my life complete!

Later
P

Tuesday, August 13, 2013

Everybody loves gel polish

I have been doing gel polish almost exclusively on my Clients.  Who needs extensions when gel polish can help grow your real ones?  Not to mention no damage either.


This is RCM Dripping in Luxury with CND Additive in Haute Pink scrubbed into the tips.  The accent nails have little embedded iridescent hollow hearts that you can barely see in the photo.


This is RCM Toast of the Town with Konad roses stamped in black and pink.  This matched a dress she was wearing to a wedding.


And just a bit closer.  It's sometimes hard to tell Clients how to 'pose' for photos lol.

I've slowed down a bit the last few weeks.  The new job is wearing me out and sometimes when I get home I just want to cancel my nail appointments.  Can't imagine having to deal with a boyfriend too...good thing I'm single right now.

Later
P

Thursday, August 8, 2013

Great Stamping Polishes

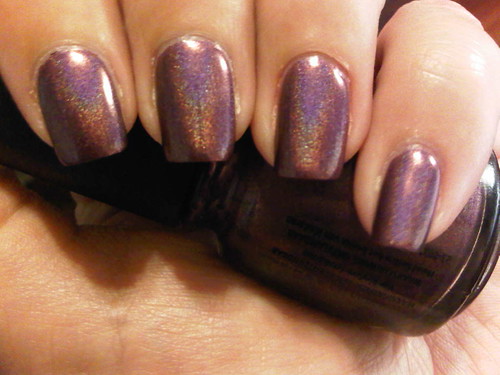
This is probably a long overdue post but I thought I'd share my favourite stamping polishes - both readily available and somewhat hard to find.

My requirements for a good stamping polish is that they absolutely must stamp well on BOTH black and white backgrounds.  Many polishes stamp decently on light colours but the true test is whether or not it shows well on black.


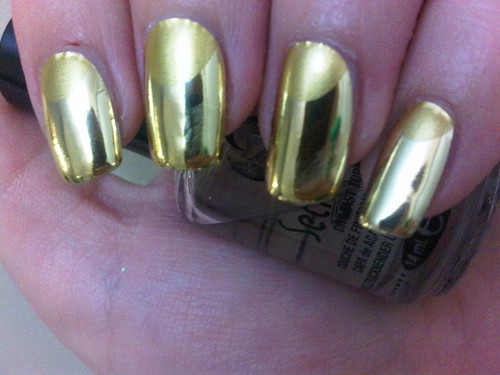
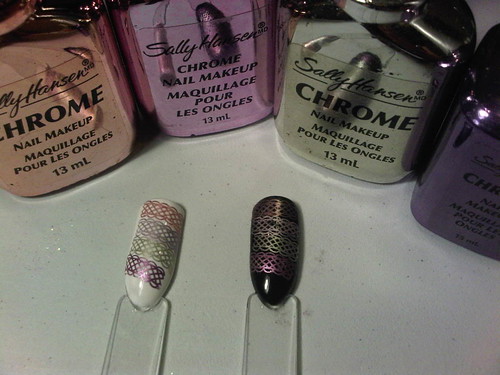
Sally Hansen Chrome polishes are fantastic for stamping.  They stamp well on both white and dark colours.  There are also old Sally Hansen Xtreme Wear polishes (white cap) that are almost exactly the same as these.  All of these can often be found in bargain bins.  I found all of mine in bargain bins for $.25 a couple of years ago with the exception of the square purple bottle on the right which I had purchased way back when these polishes were originally released.

And now on to the more readily available polishes:


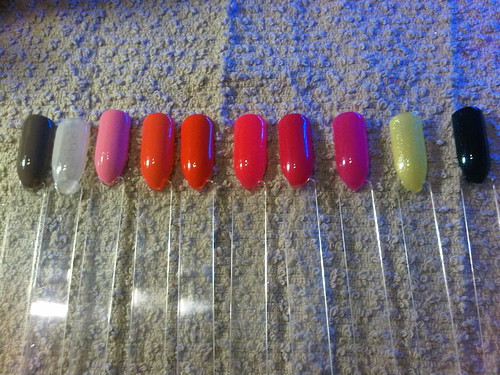
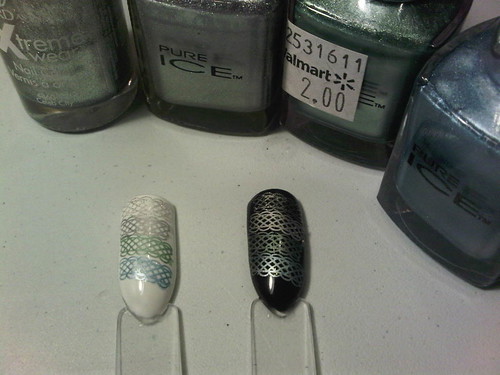
Sally Hansen Xtreme Wear in Celeb City (top) is good but has a fine glitter in it and is a little more subtle than most of the 'chrome' type polishes.  The other 3 are all Pure Ice, which is clearly available at Walmart for $2US lol.  I've heard they carry these in Canada now but I'm not sure how much they are.  From L-R or top to bottom: Silver Mercedes, First Time and Pussy Cat.


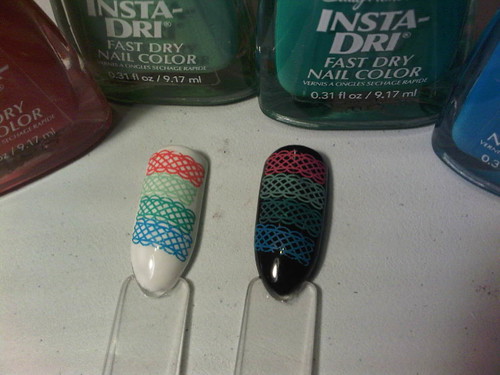
Once again we have Sally Hansen but it's the fabulous Insta-dri collection.  These are hands down the BEST polishes for stamping that you can find in your local drug store for about $6 (or $4 on sale).  The cremes especially stamp like no other brand - very opaque. Out of the 15 or so colours of Insta-dri I own, only one colour doesn't stamp well on black, even though my  photo is shitty they do show really well.  Above is L-R, top to bottom: Presto Pink, Jade Jump, Mint Sprint and Brisk Blue.


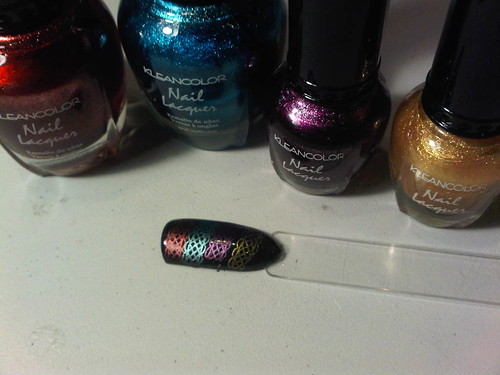
Kleancolor Metallics are worth an honorable mention.  Although not all of them stamp well on black the bold colours are just not available in other brands.


Where the Kleancolors really shine (literally) is once you add top coat.  Those vibrant kind of colours don't typically come in the chrome finishes.


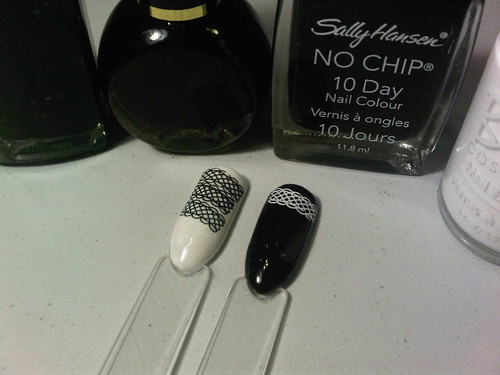
And of course the essential black and white polishes.  The good ones are harder to come by than you think because just any old black or white polish isn't necessarily going to be opaque enough to stamp with.  For blacks I've got L-R, top to bottom: Wet and Wild Black Creme, the original Konad Black and an old hard to find Sally Hansen No Chip in Black Berry.  Truth be told nothing works better than the original Konad Black.  When I use stamps that have fine lines like above or intricate designs, it absolutely has to be Konad.  For everything else, Wet and Wild is my 'go-to' black.  The Sally Hansen is a bit better than the Wet and Wild however it's close to empty and I've given up hope that I'll find another.  As for white, I have so many that just don't cut it, my original Konad white is empty and the best white I have ever found is Billie French White.  Unfortunately Billie is a Canadian polish that was sold in Dollar Giant stores across Canada.  Dollar Giant was purchased about a year ago by the US Dollar Tree and although you can still find Billie polish at the Dollar Tree, I believe it's likely they won't be stocking more and are slowly depleting their supply.  I've tried probably 6 different Dollar Trees now in SW Ontario and there is no Billie French White to be found. I do have one backup bottle left but my next bottle of white will likely be the Sally Hansen Insta-dri since I've read that their white is decent.

And there you have it.  The verdict is - cheap polish works best!  And my two most used polishes - Wet and Wild and Billie - are less than $2 CAD!  Notice there are no OPI's, Essie's or China Glaze's in this post.  If you're just getting into stamping and looking for which polishes work you can't go wrong with the Insta-dri's.  I also recommend picking up Wet and Wild Black Creme which is usually just under $2 and also Pure Ice Silver Mercedes at Walmart.  And if anyone finds Billie French White in SW Ontario let me know!

Later
P

Tuesday, August 6, 2013

Custom Gelish


I decided that I wasn't really 'feeling' any of my gel polish colours last week so I decided to create my own.


On a piece of tinfoil I added several drops of Gelish Garden Teal Party and equal parts Gelish Sheek White.  For you kiddies at home - DO NOT mix brands of gel polish when attempting to create custom colours!  These products do not have the same chemical makeup and you have no idea what kind of reaction they can create.  For this reason I have purchased a white gel polish in each of the 3 main brands I use - Gelish, Shellac and OPI Gelcolor.  The expense I feel, is totally worth it.


So you can see here my thumbnail is holding Gelish Garden Teal Party and I lightened it enough to almost match the colour to it's direct left - OPI Can't Find My Czechbook.  My custom colour is a bit lighter and a bit more green than the OPI.  The actual colour is really somewhere in between the colour of my photos.  It's a true tiffany blue but a shade darker.


I also decided to try out feathers for the first time.  I used a base of a silvery sparkle (RCM I think).  Application was much easier than I was expecting but I did accidentally get some blue gel on one nail and I probably could have used a third top coat or used Gelish Structure to smooth it out more.  I'm not sure if I can live with this for 2 whole weeks. One thing I've noticed over time is that I can now do my own gel polish manicure, including nail art in about an hour.  When I first got my Shellac kit it was taking me a minimum of 1.5 hours. When I do a Client it typically takes an hour but that includes a full manicure which I obviously don't do on myself so I'm pretty happy being able to complete my own in an hour now.

Later
P


Friday, August 2, 2013

Vitagel Part 2


So after 5 or 6 days of the Morgan Taylor polish over the Vitagel, I removed the polish with non-acetone remover and the Vitagel underneath was still perfect.


Then I painted 2 coats of China Glaze's When Stars Collide, no topcoat.  I seriously thought this polish was brown until I left the house and saw it in sunlight.  I need to review the lighting situation in my nail studio I think.


And here it is 5 days later.  Pretty impressive that a holo with no top coat can last chip free for 5 days over top of a gel polish!  I definitely had some tip wear but I've never seen a holo polish have this kind of longevity.

I'm actually still wearing it at 7 days and I've got some serious tip wear now.  I will be removing this tonight but I have to say my first experience with Vitagel was good.  If I got back into the habit of changing my nail colour every 3 days I would probably use Vitagel underneath it all the time. The only thing I would do differently is probably go with 2 coats of Vitagel next time.  I love that you can use it instead of base coat.  I did notice however that the removal was a bit harder than usual but then again, I'm used to the Shellac base coat, not Gelish, so it may be pretty comparable to the Gelish Foundation.

So the verdict is that I like it and I'm going to try and promote a nail growth program using this to help nail biters/people with weak nails so hopefully I'll have some good progress photos to show you soon.

Later
P